Chocolate Chickpea Ice Cream (Nut Free!)
Servings:8 servings
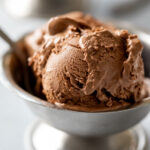
This amazing vegan chocolate chickpea ice cream is not only dairy-free and egg-free, but also contains no nuts or coconut! It's rich, silky, and so chocolatey. No one will ever believe this ice cream is vegan and made with chickpeas!Yield: makes about 1 quart, or 4 cups, of ice cream
Ingredients
- 2 cups unsweetened non-dairy milk such as soy or oat - I used plain soy.
- ¼ cup cocoa powder
- 2 tablespoons corn starch - or arrowroot
- 1 cup cooked chickpeas, rinsed and drained
- scant ½ cup organic cane sugar
- scant ⅓ cup sunflower seed butter, salted - Feel free to substitute tahini OR your favorite nut butter if okay with nuts, such as peanut, almond, or cashew.
- 2 teaspoons vanilla extract
- ½ teaspoon fine sea salt - Add another pinch of salt if using an unsalted seed/nut butter.
- 7 ounces dairy-free chocolate (approx. 60 to 65 % cacao solids) - See Notes for selecting a chocolate.
Instructions
Prep:
- If using an ice cream maker with a removable canister, be sure to freeze the canister for at least 24 hours before making ice cream. Also note that the churned ice cream needs about 2 to 3 hours in the freezer to reach a firmer, scoopable consistency.
Make the ice cream:
- In a small sauce pan, whisk together 1 cup of milk, cocoa powder, and corn starch. Bring to a simmer over medium heat, whisking frequently. As soon as it begins to simmer, reduce heat to medium-low. Whisking constantly, cook until thickened, about 1 to 2 minutes. It will look similar to pudding. Remove from heat, and set aside.
- In a blender (see Notes) combine the remaining 1 cup of milk, chickpeas, sugar, sunbutter, vanilla, and salt. Blend on high until completely smooth, about 1 minute.
- Melt the chocolate using a double-boiler or by placing in a microwave-safe bowl and microwaving in 15 to 20 second intervals (stirring in between) until melted. Add the melted chocolate to the blender, and blend until smooth and fully incorporated.
- Add the cocoa "pudding" to the blender, and blend again. If the mixture feels warm at this point, refrigerate for 30 minutes to 1 hour. It doesn't necessarily need to be cold as it goes into the ice cream maker, but definitely no warmer than room temperature for the best results.
- Churn the mixture according the instructions for your ice cream maker. With my Cuisinart 2 Quart machine it takes about 22 minutes to reach soft serve consistency.
- For firmer, scoopable consistency transfer the ice cream to a freezer-safe container. Freeze for 2 to 3 hours. After 3 or 4 hours, and definitely once the ice cream has been in the freezer overnight, it will be VERY hard straight out of the freezer. It's important to let the ice cream soften at room temperature for at least 20 to 30 minutes before scooping, depending on how long it's been in the freezer.TIP: consider using smaller, individual serving-size containers, but keep in mind small containers will freeze and thaw more quickly than described here.
Notes
Choosing a Chocolate
The type of chocolate you use will impact the sweetness of the ice cream. It's easy to account for this by adjusting the amount of sugar. If you use semi-sweet chocolate, typically around 60% cacao solids, a scant ½ cup sugar will be plenty.
If you're only able to find a darker chocolate, such as 70%, you can always add a bit more sugar to the blender if desired.
For strictly nut-free, Enjoy Life brand is readily available online and in many stores. I'm also a fan of Tony's Chocolonely dairy-free bars, but their chocolates may contain traces of tree nuts due to shared processing equipment.
Blender
I tested the recipe using my Vitamix, but since we're not using any whole nuts or seeds, I suspect a standard blender will be fine.
Nutrition
Calories: 316kcal | Carbohydrates: 34g | Protein: 8g | Fat: 16g | Fiber: 6g | Sugar: 20g