Gluten-Free Vegan Chocolate Pie Crust
Servings:10 servings
This chocolate pie crust is vegan, gluten-free, and full of deep, dark cocoa goodness. Made with almond flour and black cocoa, it has that nostalgic chocolate cookie crust essence, without any actual cookies involved. Best of all, it’s oil-free and butter-free, slices beautifully, and supports creamy pie fillings like a champ! Ideal for no-bake, chilled fillings like peanut butter, chocolate, grasshopper, banana cream pie, etc.
Ingredients
- 2 cups fine blanched almond flour - see Notes for important tips on measuring
- ¼ cup tapioca starch - or arrowroot
- ¼ cup black cocoa powder - sifted if clumpy; can sub regular or Dutch-process cocoa
- ½ teaspoon fine sea salt
- ¼ cup water - 2 fl. oz.
- ¼ cup sugar
- 1½ teaspoons vanilla extract
Instructions
- Preheat the oven to 350°F (175°C).
- In a large mixing bowl whisk the almond flour, tapioca, black cocoa, and salt. In a small bowl or mug, whisk the water, sugar, and vanilla.
- Pour wet into dry, and use a fork to mix. It will seem dry initially, but as you continue to mash everything together the moisture will distribute. After mixing with the fork, switch to using your hands to finish combining the ingredients. Form into a ball. The dough should be moist enough to hold together but not overly sticky. If it's crumbly, add 1 teaspoon water and mix again. If it's too sticky, add a bit more almond flour.
- Place the dough on a large piece of parchment paper. Use your palm to flatten the dough into a disc. With a rolling pin, use firm and steady pressure and roll to approx. 11½ inches in diameter. If the dough sticks to the rolling pin, place another piece of parchment on top. NOTE: It's important that the dough not be too thick, especially around the edges. After flipping onto the pie plate in the next step, you should have a small amount of excess to trim away.
- Flip the dough onto a 9-inch pie plate (glass or ceramic). Peel away the parchment. Gently press it into the bottom and sides of the pie plate. Use a knife to trim the edges. Any holes or tears can be easily patched with the scraps.
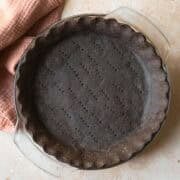
- Decorate the edges of the pie crust as desired. I like the simple knuckle pinch technique (photo example here). Use a fork to dock the bottom of the crust (poke vent holes).
- Bake in a preheated 350 degree F oven for 27 to 30 minutes or until the edges are crisp. The center should look set but will feel slightly soft. The crust will continue to firm and crisp up as it cools. Cool before filling.
Notes
This crust is best suited for no-bake and chilled fillings. While it may also work for baked pies, I haven’t tested that yet, so results and bake times may vary.
Measuring: I highly recommend using a kitchen scale (tap on Metric above to see the ingredient weights). If measuring by volume, pack the almond flour into the cup, similar to the way brown sugar is measured. For the cocoa powder and tapioca, whisk them first. Then spoon into a measuring cup and level off the excess.
Store: The pie dough can be made in advance. Form into a ball and cover completely with plastic wrap so it doesn't dry out. Store in the refrigerator for up to 3 days. The dough can also be frozen. Thaw overnight in the refrigerator before rolling out.
Nutrition
Calories: 165kcal | Carbohydrates: 13g | Protein: 6g | Fat: 12g | Saturated Fat: 1g | Cholesterol: 0mg | Fiber: 3g | Sugar: 3g
