
This vegan banana pudding is SO delicious and couldn't be easier! With layers of creamy dairy-free pudding, sweet bananas, and vanilla wafers, it has all of the irresistible flavors and textures of traditional banana pudding but no dairy or eggs! Only 5 ingredients and 15 minutes to prepare, it's the ultimate no-bake vegan dessert.
Jump to:
Why You'll Love It
I usually like to make desserts from scratch. Whether it's our favorite vegan strawberry cake or a simple pan of brownies, there's just something so heart-warming about presenting a fully homemade dessert to your loved ones.
But sometimes there are good reasons for taking short cuts! And when it comes to this vegan banana pudding, I think you'll completely agree it has its perks.
Is instant pudding mix vegan?
Thankfully, yes! I know of several brands that are dairy-free and accidentally vegan. A quick online search shows there are others, too. These are the three I've tested:
- Jell-O instant pudding - Available in most stores, and yes, it works with non-dairy milk. Instructions on the box say to visit the Jell-O website for details. Basically, they recommend reducing the amount of milk used per package from 2 cups to 1.25 cups. If you avoid artificial flavors, colors, and preservatives, go with homemade vegan pudding instead, or use one of the more natural options below.
- 365 brand (Whole Foods) organic instant pudding - This is what I used when I first shared this recipe 4 years ago. Unfortunately, at the time of this update, it looks like it has been discontinued. Fingers crossed it becomes available again!
- Simply Desserts (Simply Delish) - This one is clearly labeled as vegan, but note that it's also sugar-free, which may or may not be what you want. Be sure to check the ingredients to make sure it works for you.
UPDATE: Since Whole Foods discontinued their instant pudding, I decided to create my own! This instant pudding mix is so easy and allows you to stick with the no-cook prep while also avoiding the artificial ingredients in other brands.
I decided to use instant pudding mix in this vegan banana pudding because:
- Since the pudding isn't cooked, the dish doesn't need to chill as long before serving.
- And boxed pudding mix tastes more "classic" and vanilla-ish, like the pudding I remember from pre-vegan days.
It's definitely easy to make vegan vanilla pudding from scratch. So if you can't find an instant pudding mix that works for you, don't even stress! Just go with homemade.
I really wanted this dessert to be super easy and have the classic vanilla pudding flavor that I remember from childhood, you know? And box pudding mix totally achieves it.
So put away your over-achiever hat for this one, and get ready to swoon over the most delicious, easiest vegan banana pudding ever. I promise, no one will know how easy it was to make, and everyone will love it!
Ingredient Notes
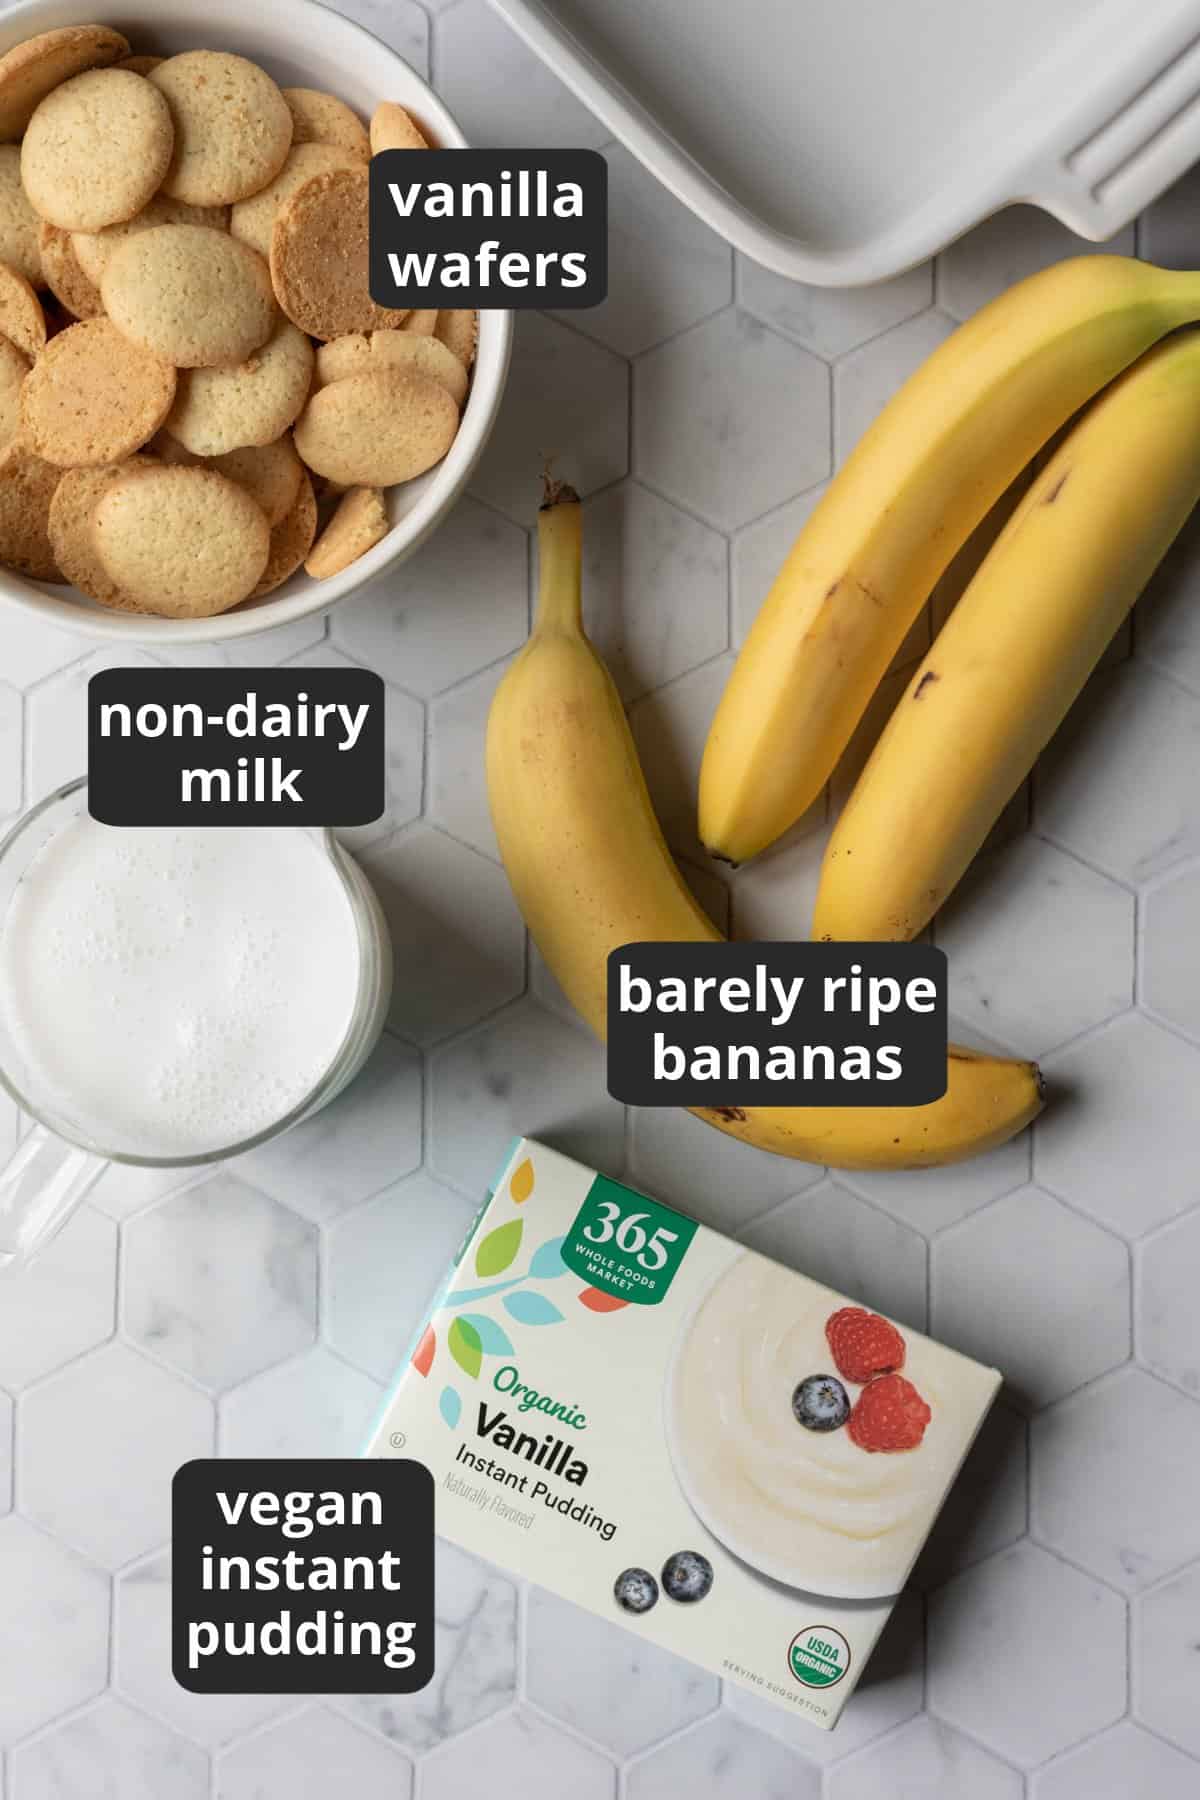
- Bananas - for banana pudding you want bananas that are barely ripe. They should be sweet, firm, and not have many brown spots (save the spotty, overripe ones for banana bread).
- Vanilla Wafers - thankfully, these 365 brand organic vanilla wafers are accidentally vegan. Beyond that, finding vegan vanilla wafers is tricky! If you feel like making your own, check out this recipe for vegan and gluten-free vanilla wafers. Or use a different type of crispy cookie like vanilla snaps or any shortbread-style cookies.
- Instant Vanilla Pudding - as discussed above, there are several brands available that are vegan (even if accidentally so). My favorite was the Whole Foods brand instant pudding mix. Since it seems to have been discontinued, my new go-to is homemade vegan instant pudding mix!
Jell-O instant vanilla pudding mix is an "accidentally vegan" option, though it contains additives and preservatives you may not want. There are other instant pudding mixes available; be sure to check the ingredients.
My classic vegan vanilla pudding is another homemade option. - Non-Dairy Milk - I used unsweetened almond milk for the batch in the photos. I also tested coconut milk (the refrigerated kind), which added a slight coconut flavor. Almond milk is the best choice for classic banana pudding flavor.
- Dairy-Free Whipped Topping - So Delicious Coco Whip is the absolute best out there! Check their website to (hopefully) find a store near you. Non-dairy Reddi-Wip is another tasty option that may be easier to find depending on where you shop.
- Or if you're in the mood for a light, homemade option, go with this vegan whipped cream.
Want to save this recipe? 📩
Keep an eye out for more delicious recipes. Unsubscribe anytime.
How To Make Vegan Banana Pudding
First, if you're preparing vegan vanilla pudding from scratch, make sure you have enough ingredients for a double batch, and at least 4 hours for the assembled dish to chill.
If using instant pudding, be sure to read the instructions on the box. The brand I used called for simply whisking the powder into milk, but that led to clumpy pudding. So I decided to use a blender to combine the powder and the milk, and then use a handheld electric mixer. If you don't mind slightly clumpy pudding, feel free to skip the blender step!
To fill a 9-inch square dish, we're going to use two boxes of pudding mix, but prepare them one at a time:
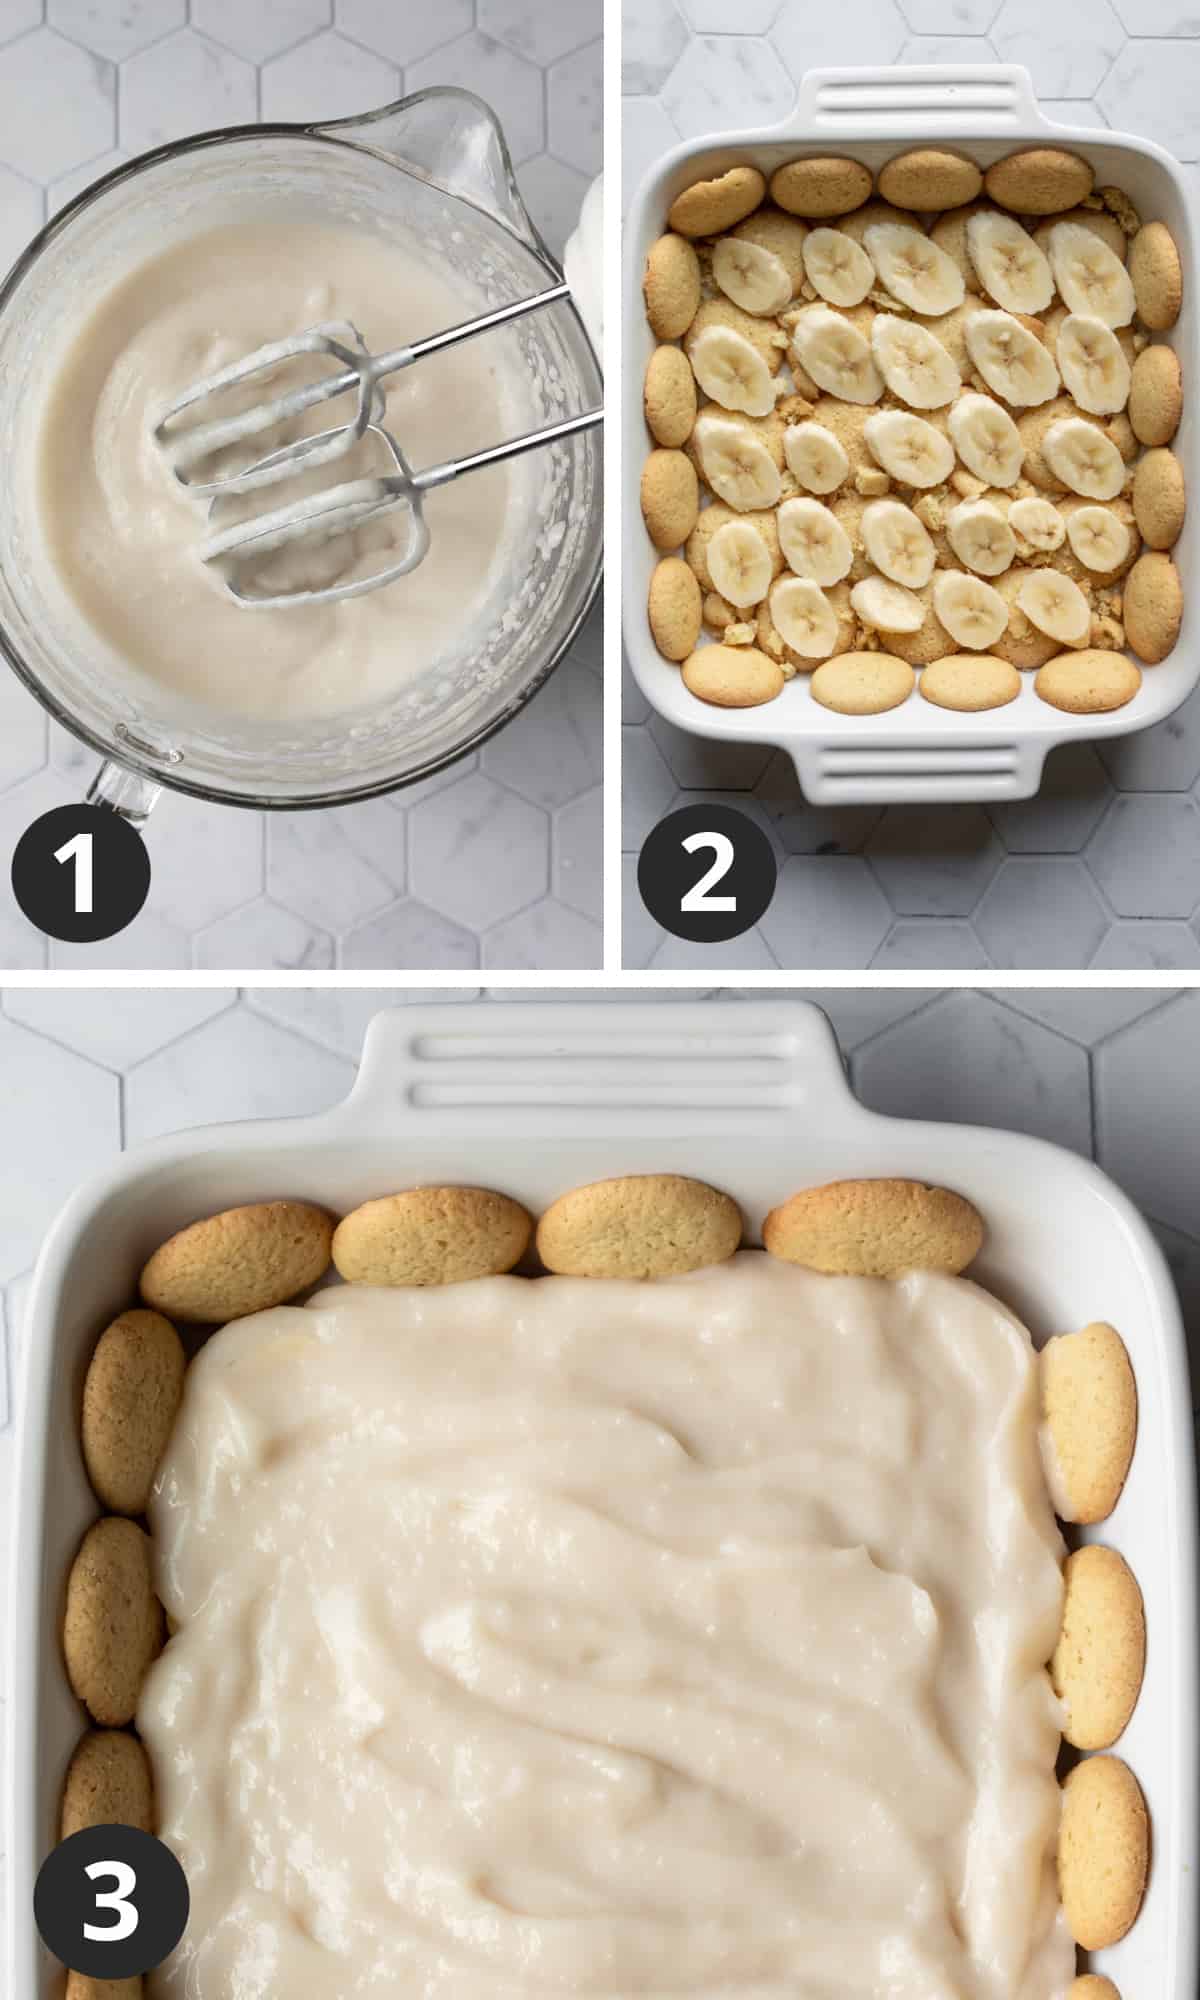
- Prepare one box of pudding: add 2 cups of milk to a blender. Remove the small center cap in the blender's lid. Turn the blender on low speed, and pour the pudding mix through the hole in a slow but steady stream. Continue to blend on low speed just until incorporated, a few more seconds. Immediately pour the pudding into a large mixing bowl, and use an electric handheld or stand mixer to beat the pudding until thickened, 1 to 2 minutes. Set aside.
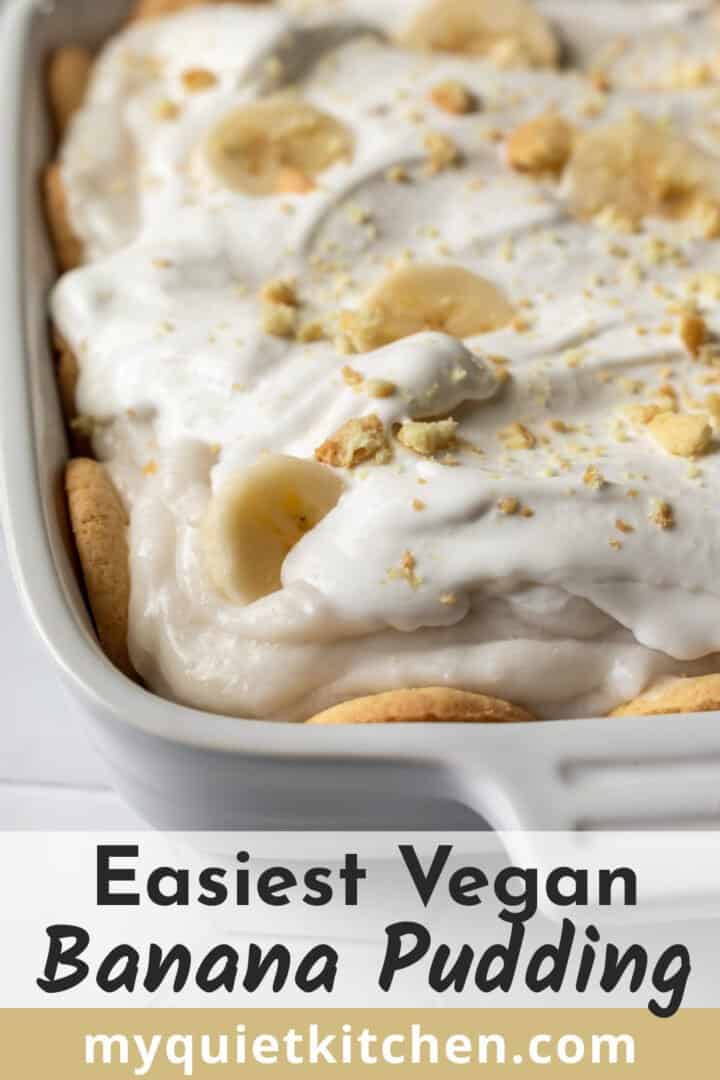
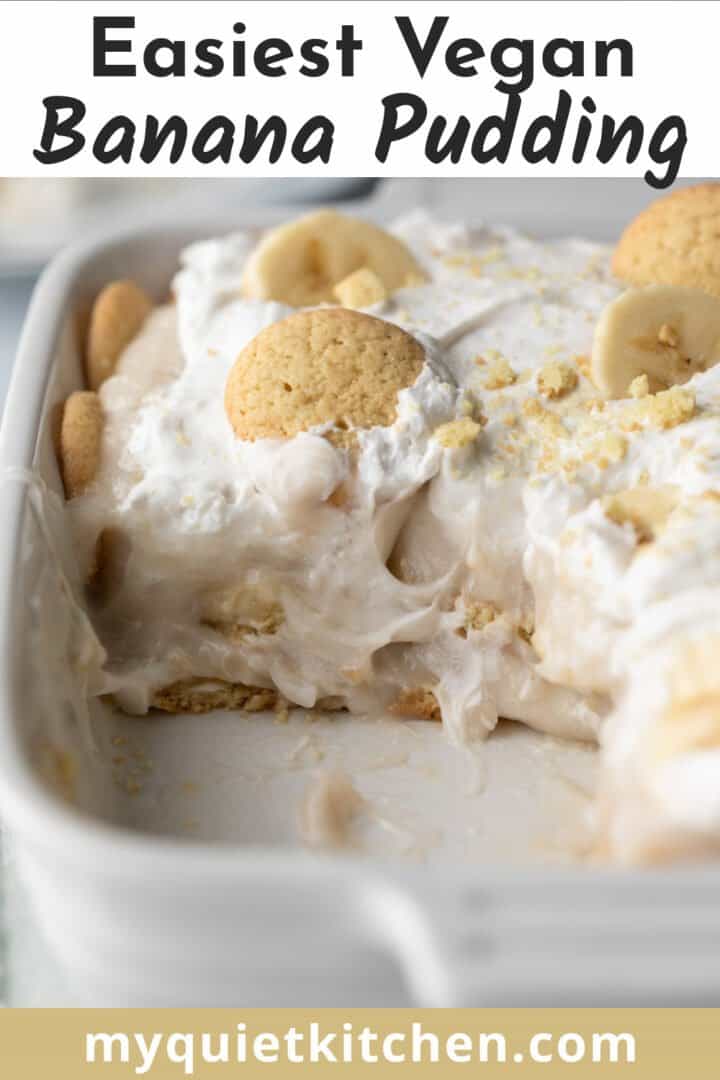
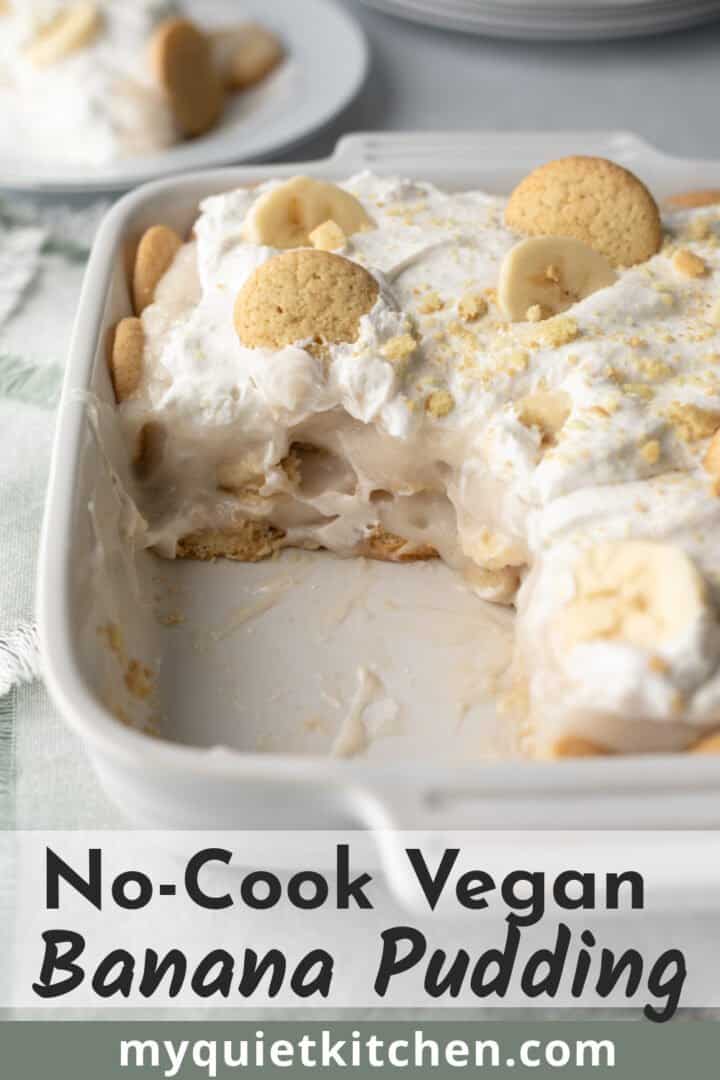
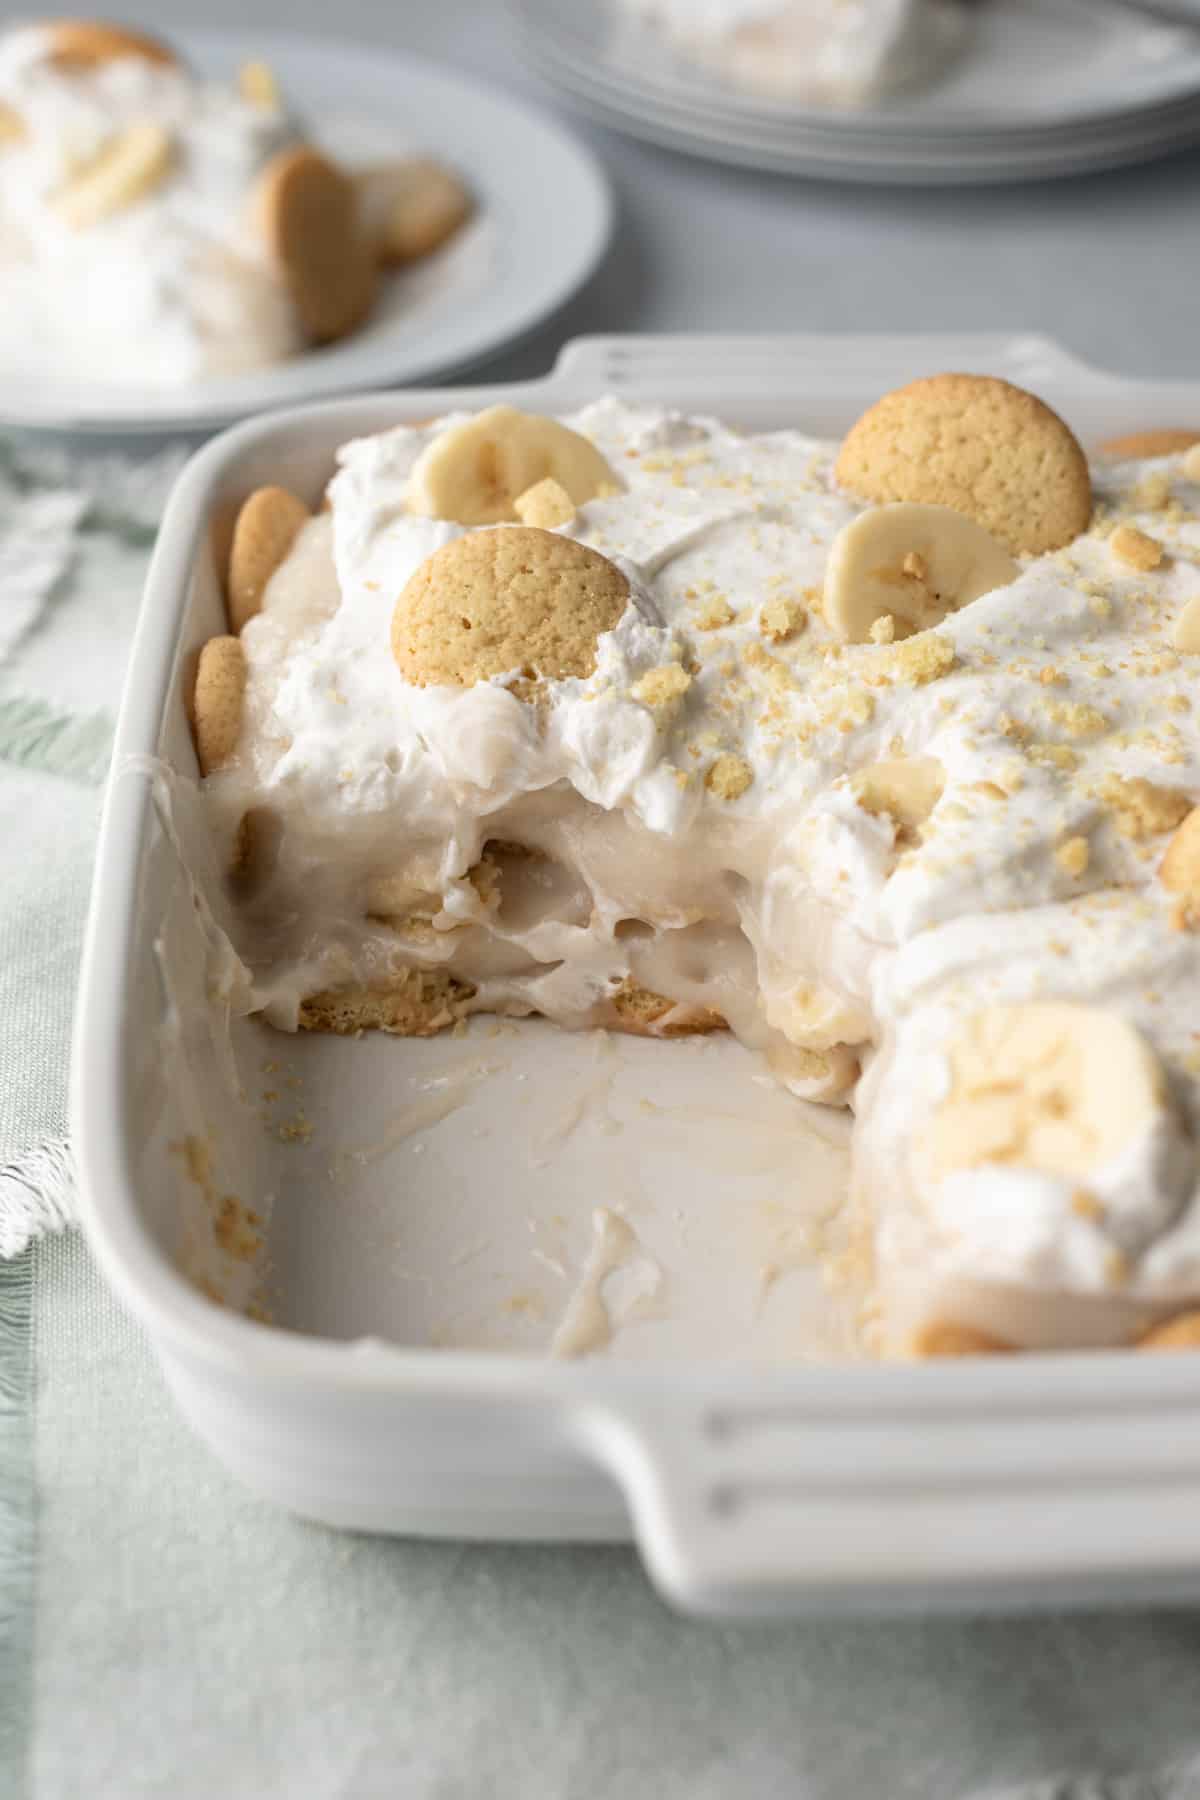
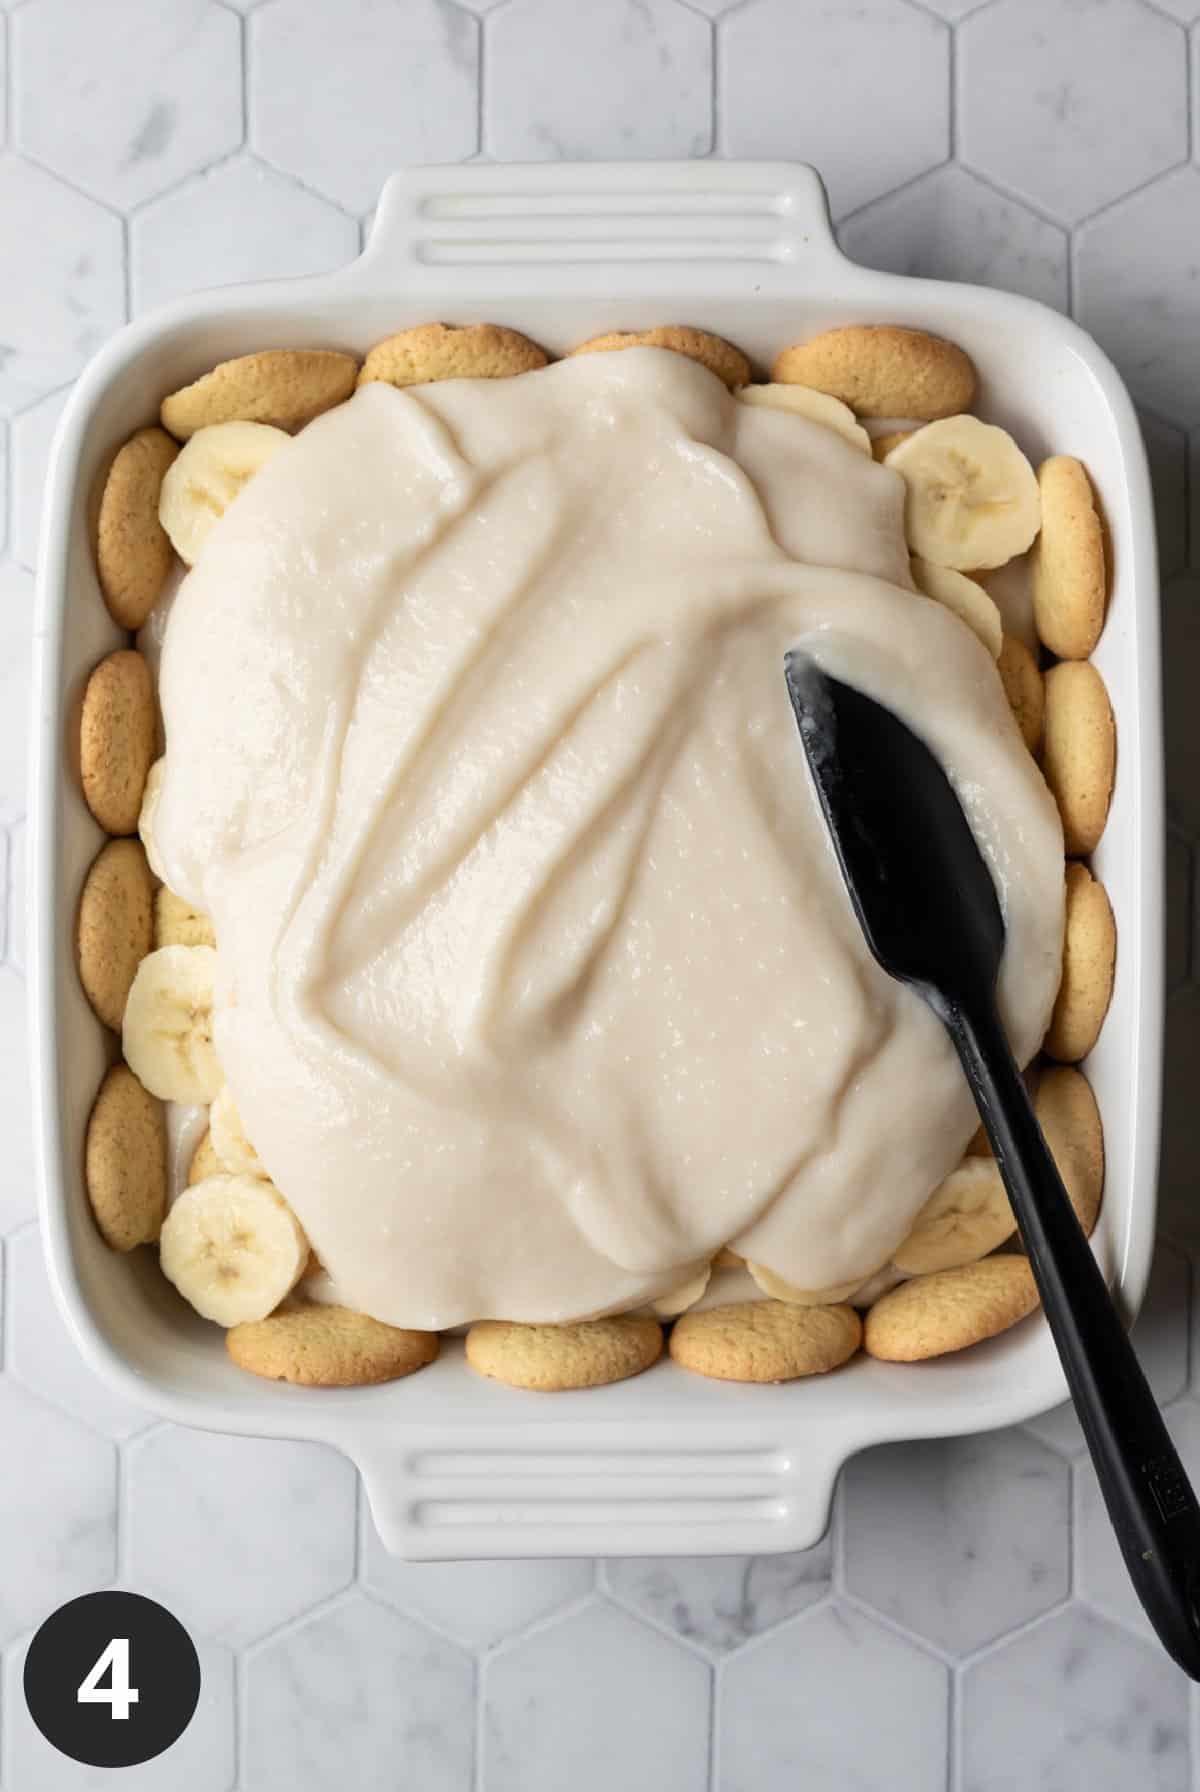
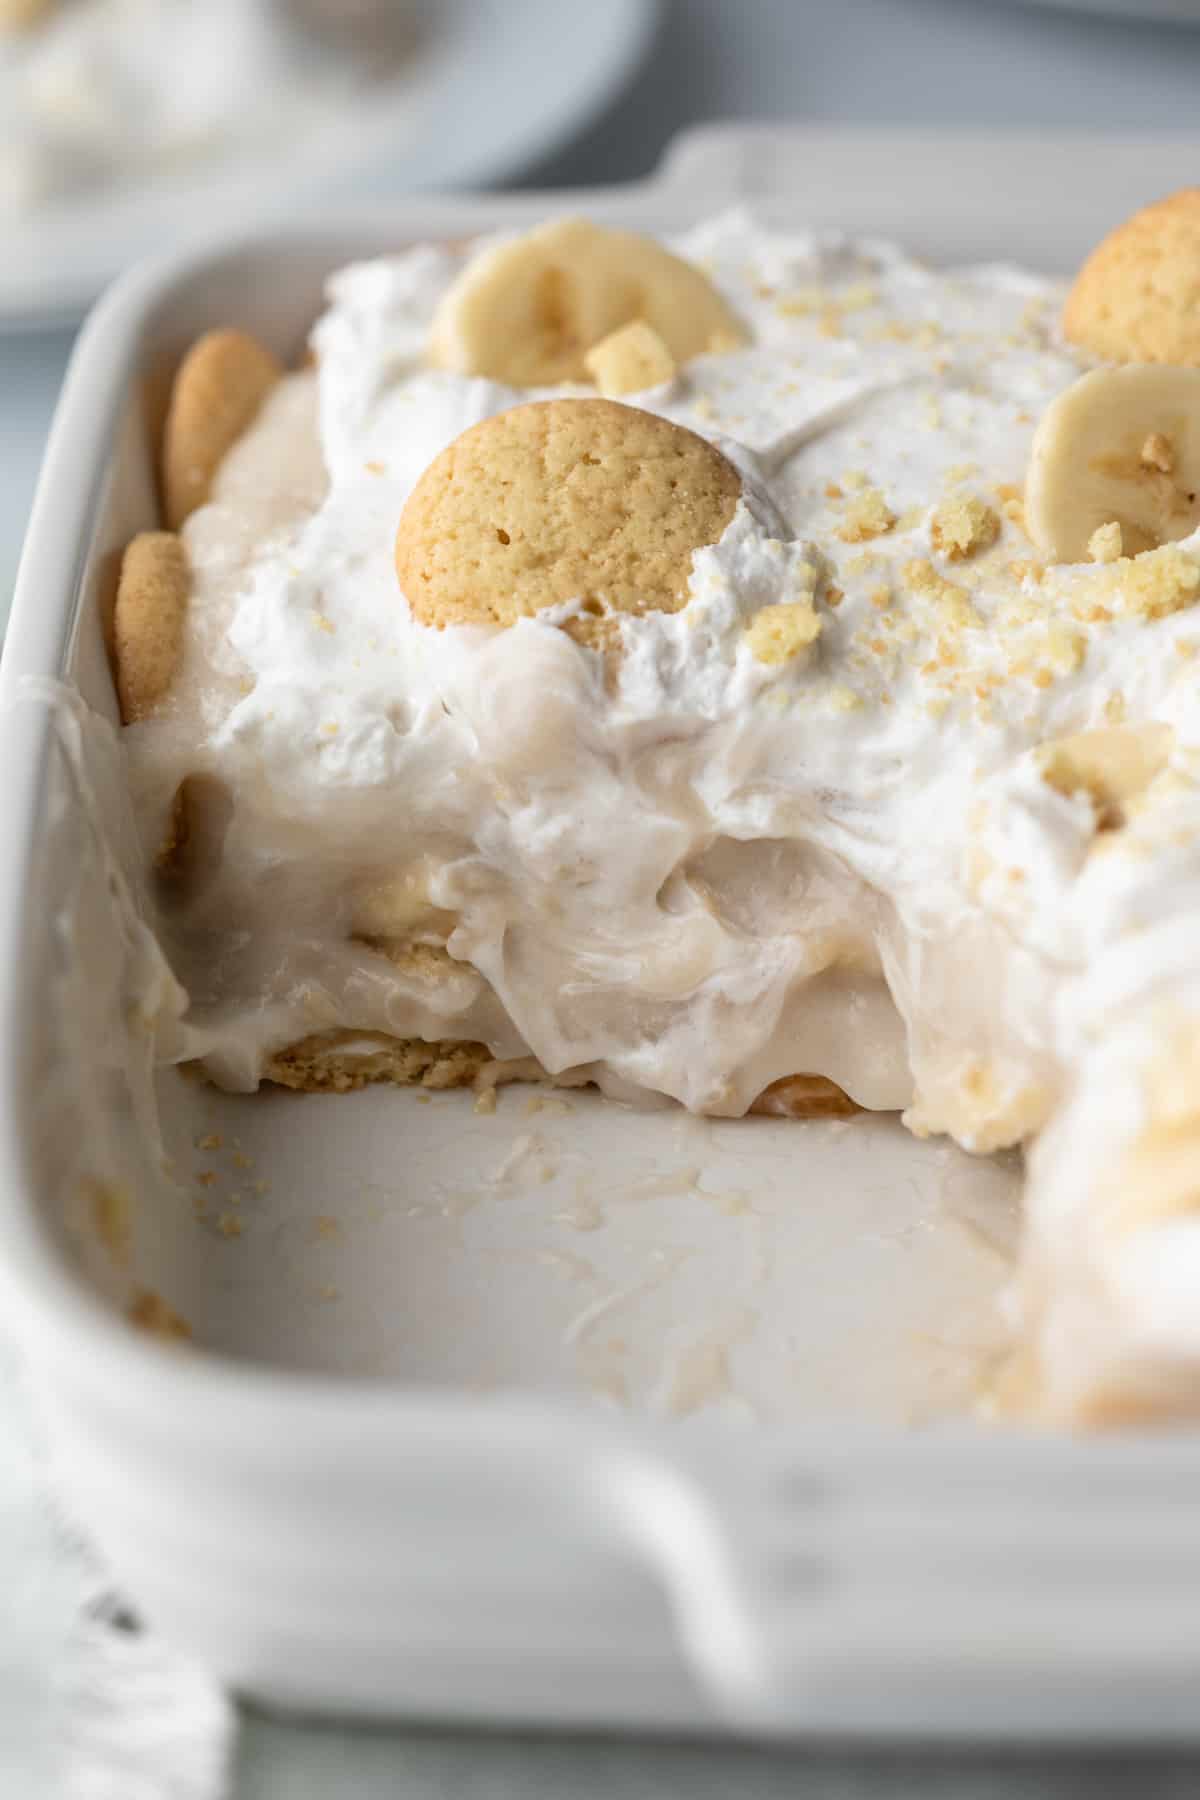
- Arrange vanilla wafers across the bottom and sides of an 8- or 9-inch square glass or ceramic dish. Crumble 3 or 4 wafers by hand, and sprinkle the crumbs into the gaps between the cookies. Arrange banana slices on top of the cookies. One large banana should be enough for each layer.
- Spread the pudding on top of the banana and wafers.
- Now make the 2nd batch of pudding: add the remaining 2 cups of non-dairy milk to the blender and prepare the pudding the same way you did before. Repeat the layering process, adding a layer of wafers, sliced banana, and the 2nd batch of pudding.
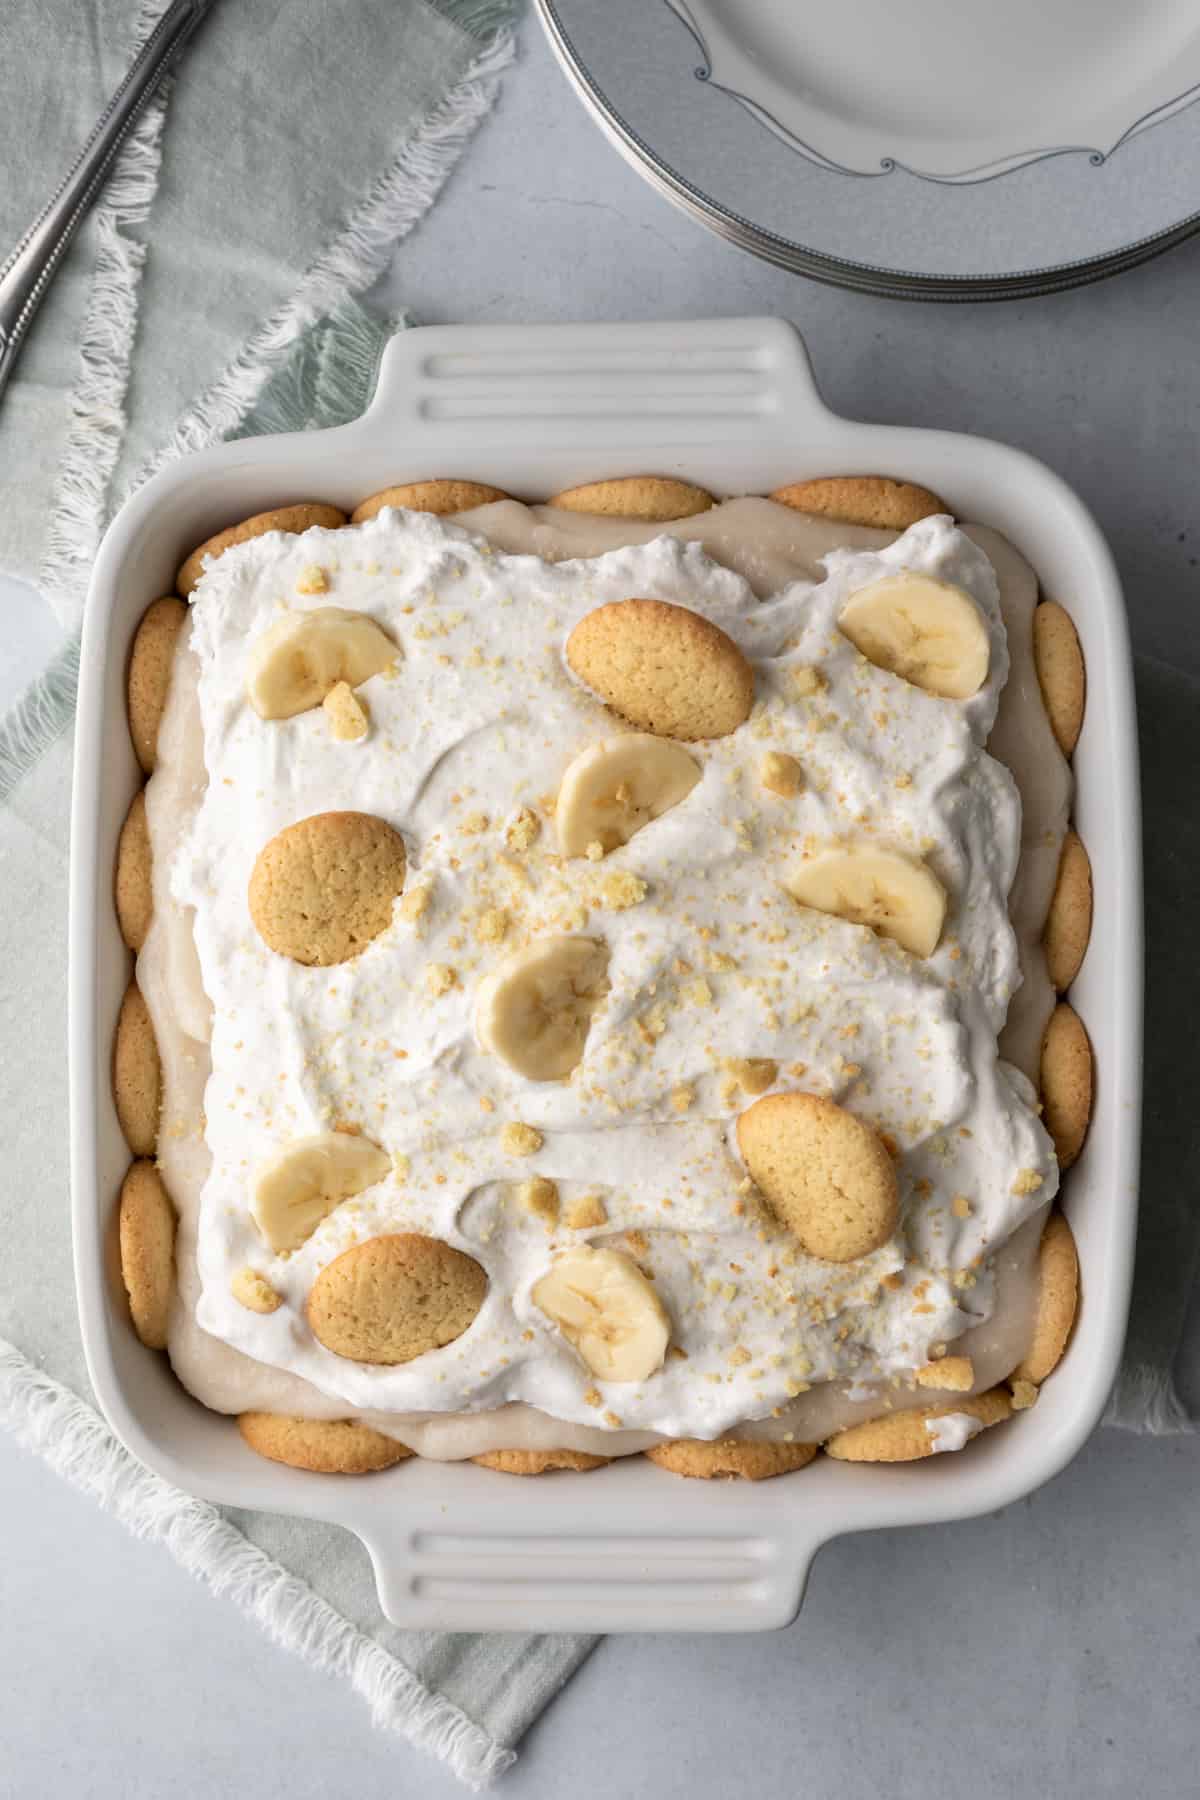
Finally, refrigerate the banana pudding for at least 3 hours. Then top with thawed dairy-free whipped topping, crumbled vanilla wafers, and a few slices of banana.
Related: Check out this cinnamon-spiced vegan rice pudding next.
Substitutions & Tips
Pudding: Feel free to use a cook-and-serve pudding mix instead of instant. Note that the finished dish will need more time to chill and set since the pudding will be hot from the stove. Allow at least 4 hours.
Milks: I've tested three brands of instant pudding mix (365, Jell-O, and Simply Desserts), with almond milk, soy milk, and oat milk. All worked well. Coconut milk worked with the 365 brand pudding, but may not work with others. Choose an unsweetened non-dairy milk since the pudding mix is already very sweet.
Batch Size: Feeding a crowd? Double the recipe to fill a 13x9-inch glass dish.
Tip! If you plan to add sliced banana on top as decoration, toss them with a splash of lemon juice to prevent browning.
Recipe FAQs
Any shortbread type of cookie works well in banana pudding. You can also use ginger snaps, lemon snaps, or graham crackers. To keep the recipe vegan, be sure to check the ingredients for dairy, eggs, and honey. For a gluten-free and vegan option, try almond flour cookies.
The banana slices inside banana pudding are sealed in and protected from air by the layers of vanilla pudding, as well as the whipped topping. Sliced banana used to decorate the top of the dessert needs to be brushed or tossed with lemon juice to prevent oxidation.
Yes, vegan banana pudding can be prepared a day in advance. Wait until just before serving to add the whipped topping and decorative wafers and banana on top.
Banana pudding is best enjoyed within 8 to 12 hours, though leftovers will keep for up to 4 days. Store in an airtight container in the refrigerator.
I hope you LOVE how easy and delicious this Vegan Banana Pudding is. If you try the recipe be sure to drop a comment below to let us know!
More Classic Vegan Desserts
Recipe
Easy Vegan Banana Pudding (No-Cook)
Ingredients
- 2 (4-serving) boxes instant vegan vanilla pudding mix - package size varies by brand; see Notes for tested brands and homemade options
- 2⅔ to 4 cups unsweetened non-dairy milk such as almond, soy, or oat - almond milk tastes best
- 9 ounces vegan vanilla wafers - I used the 365 brand
- 2 large barely ripe bananas
- 1 tablespoon lemon juice, optional - prevent browning of bananas used on top but isn't necessary
- 3 cups So Delicious Coco Whip, thawed in the refrigerator - or homemade whipped coconut cream
Instructions
- NOTE: Check the instructions on the pudding mix. The brand I used (365) called for simply whisking the powder into milk, but that led to clumpy pudding. So I decided to use a blender to combine the powder and the milk, and then use a handheld electric mixer. When I tested other brands of pudding mix, including Jell-O, blending was NOT necessary.
- Prepare one box of pudding according to package directions. NOTE that with Jell-O and Simply Desserts, you need to reduce the amount of milk used for the pudding to set. The manufacturers indicate 1¼ cups of non-dairy milk per box, but I found the pudding tastes better and still sets with 1⅓ cups. So you'll need a total of 2⅔ cups non-dairy milk for either of those brands. Use an electric handheld mixer and beat until thickened and soft-set. Set aside.Original instructions (for 365 brand): add 2 cups of milk to a blender. With the blender on low speed, remove the center cap from the lid and pour the pudding mix through the hole in a steady stream. Blend for just a few more seconds on low speed. Immediately pour the pudding mixture into a large mixing bowl, and use an electric handheld or stand mixer with whisk attachment to beat the pudding until thickened, 1 to 2 minutes. Set aside.
- Arrange vanilla wafers across the bottom and sides of an 8- or 9-inch square ceramic or glass dish (approx. 2.5 liter capacity). Crumble 3 or 4 wafers by hand, and sprinkle the crumbs into the gaps between the cookies. Slice one banana, and arrange on top of the cookies. (One large banana should be enough for each layer.) Spread the pudding on top, all the way to the edges so that the banana is fully covered.
- Now make the 2nd batch of pudding: Prepare the pudding the same way you did before. Set aside.
- Repeat the layering process: a layer of wafers, sliced banana, and the 2nd batch of pudding.
- Refrigerate for at least 3 hours. Cover with plastic wrap if refrigerating longer. Before serving, top with dairy-free whipped topping. If also decorating with sliced banana, toss banana with lemon juice to prevent browning. Crumble a few vanilla wafers on top and serve.
Notes
- 365 brand (Whole Foods) organic instant pudding - the one I used when I first shared this recipe. Unfortunately, at the time of this update, it seems to be discontinued.
- Simply Desserts - This one is clearly labeled as vegan, but note that it's also sugar-free. Be sure to check the ingredients.
- Jell-O instant pudding - This is accidentally vegan and easy to find in stores. If you avoid artificial ingredients, go with homemade pudding instead.
Estimated Nutrition (per serving)
Nutrition is an estimate and will vary depending on the exact amounts and ingredients used.
laura says
thanks for the recipe! i just wanted to point out for any other first-timers like me, that you'll want to give this at least 24 hours in the fridge before serving it, i think. the flavors meld MUCH better, the cookies soften more and the pudding thickens.
Jillian says
I was a little nervous to make this recipe after reading the notes and some of the comments about the pudding setting improperly, but it turned out great. I used simply desserts pudding and followed the directions on the package. I also used gluten free vanilla wafers. On their own, the pudding and wafers weren't that good - which also made me nervous - but with everything together it tasted so good after 3 hours in the fridge and even better the next day!
Martha says
This is AMAZING! We LOVE banana pudding, and this is the best vegan version I have ever had! I used your home made vanilla pudding recipe and it turned out fabulous! I will be making this again and again and again!
Bobby Plough says
We tried this recipe and it did not come out very good at all! We went to WFM to get the 365 vanilla pudding mix and they said they do not carry it anymore and might have discontinued it. We did get the 365 vanilla wafers! So we used jello brand instant vanilla pudding and made it with almond milk. We blended it as suggested but did not thicken much. We put the recipe together thinking it would set after 3 hours of refrigeration. It did not! More research needs to be done on using other mixes! We love your recipes and this is the first time one has not worked. Seemed pretty simple but…….
Lori Rasmussen says
Hi Bobby,
Thanks so much for the heads up about the 365 pudding mix. I had no idea it was discontinued. Also, I'm really sorry to hear yours didn't work out.
ETA: I just finished testing Jello pudding with different non-dairy milks (almond, oat and soy). The box points you toward their website for instructions. They say to reduce the amount from 2 cups to 1.25 cups, but that seemed pretty drastic to me. So I bumped it up to 1 1/3 cups milk per box and it thickend up nicely! It does take a couple of minutes, though, even with an electric mixer. I hope this is helpful for next time!
Sabrina M says
Hi! I live in Los Angeles and the 365 brand is still available at Whole Foods out here as of now! The blending method worked well.
Carrie says
Hi Lori, I love your recipes so much! I am really interested in making this pudding with homemade vanilla wafers. Which of your oil-free cookie recipes would be the best swap for storebought cookies in this recipe?
Lori Rasmussen says
Thanks so much, Carrie. 🙂 Hmm that's a good question! Oil-free cookies tend not to be very crisp, but if I had to pick one or two that seem most promising, I would say the 3-ingredient almond flour cookies or these (they're similar but also have oats and granulated sugar, which helps the texture): https://myquietkitchen.com/almond-flour-oat-cookies/ You could omit the cinnamon to make them more vanilla-forward. Hope that helps!
Kim says
Fantastic! And honestly better than the last recipe I made - with pudding from scratch. Will make again, and probably soon! Thanks for such an easy recipe.
Annette says
Love the no bake, too hot to use the stove. My kids loved this recipe, so did I. Thanks!